The Setup
The Wiki project in LIS 506 was the final project for the class. After weeks of learning about the various areas of information technology, the goal of the wiki project was to demonstrate that new found knowledge. We were given 3-4 weeks to get into groups, choose a topic and begin and finish the project. Each group consisted of three students. We were not assigned to groups but given the option to form our own groups. The topic had to be related to information technology in the library science field. We chose topics by searching through the Wikipedia database to find any library information technology that had little or no information on the subject. After some searching, my group decided on the topic of e-resource management systmes (ERMS), which was not mentioned in Wikipedia at the time.
The Software
The software that our professor decided to use was MediaWiki. The definition given by Wikimatrix, MediaWiki is a software used by Wikipedia and is a software that supports large and small sites. Our professor wanted us to get a feel for how Wikipedia functions work by using this particular software. We were not connected to Wikipedia, but by using the software, she created a website that had the wikipedia feel to it. If I could, I would post the url to the blog here, however the assignment that was done for this class is not for public viewing. To get an idea of the structure and extent that my classmates and I did our project, Library success is a great example to check out instead. Other than that, I will be going through my project with screenshots and explaining how most of the components of the wiki works.
Class Mainpage
This page served as the class mainpage. Each group was represented by a link to their topic. This page was represented in the left hand corner menu by a link called Main Page. If I needed to go to go and comment or edit another group's topic, I would click on Main Page to come back to the list of topics.

ERMS Mainpage: Content
The main page served as a compilation of the major topics that would be discussed in ERMS. Similar to the Main Page, the ERMS mainpage also has links to ERMS related topics, but contains far more information. Rather than just links, each subtopic has a paragraph briefly explaining what each topic entails and for further exploration, a link to more content.

ERMS Mainpage: Structure
As you become familiar with wikis, there is content and than there is structure. For each page of the article there is a structural outline that allows you to publish, edit, manage and leave comments about content you've created. Looking at the screenshot above you will see in the picture, six tabs that can be found at the top of the article. They are: article, discussion, edit, history, move, and watch. We will be discussing the first four tabs since these were the only tabs that my classmates and I used consistently during the making of the project.
Article
The subtopic that I will use as an example will be History and Development of ERMS under the Driving Forces of Development on the main ERMS page. The article tab is perhaps the most important page since it is the first page that users will find when searching for their topic. For those who have no need to edit the article, this page is the only page that users will need access to.

Discussion
This second tab is the behind the scenes part of the article tab. Although it is behind the scenes, anyone can still have a look and see what is being written here. The discussion tab is the place where online conversations between the various editors is posted. Any comments or talk that needs to take place all happens here. If someone has a reason as to why they deleted certain information in the article, it will be found here. If one editor added another wikipedia stub (an short article in need of expansion) to the article it can be found here. This is a good place to explore ideas as well. It's an online discussion board. Depending how detailed the content is in the article, the discussion board can be full of discussion, or minimal at best. As for the example shown below, not much was being discussed since this subtopic was mostly written by one person.

Edit
The edit tab can be a little confusing. Depending on which tab you are on, the edit tab will lead you in a few different directions. If I am on the article tab (figure 1), the edit tab will lead me to content within the article. If I am on the discussion tab (figure 2), the edit tab will lead me to content within the discussion. This may sound fine in writing, but in action, its a different story. When you see the picture, you will notice there is no clear definition that says "edit article" or "edit discussion." I didn't even think about this or discover this until I was doing this assignment. A slight difference that can be found is a little tab that has a "+" sign beside the edit tab for the discussion tab. Whatever the case, edit area contains a box called the sandbox. It is here that the drafts for whatever section you are in, takes place. The buttons above the sandbox may be familiar to some people since they are similar in appearance to some blog tabs that are found above their sandboxes. This is the place you draft your conversations or content of the article.
figure 1
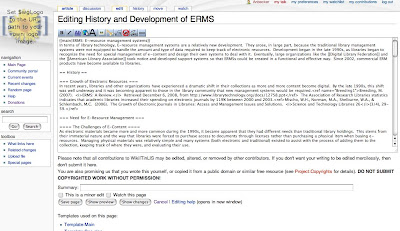
figure 2

History
The history tab is basically an area that contains all the time-stamp information about the article, discussion or any other of the tabs. It is here that information about the time, date and editor is kept. This is also the area that people can come to to revert back to a previous version of the article. If someone has vandalized the article by deleting everything and leaving an crude message behind, it can be easily fixed, by clicking on a previous time-stamped date. Wonder what that random addition information is besides the time, date and editor is? This is a summary. This can only be found under the edit tab. Below the sandbox are several radio buttons, and a small text area that says "summary." This is where you put the addition information. This sample that is provided is from the edit (talk) tab and not the article tab.

Conclusion
I am still a student when it comes to learning this information. The difference this time round is that I am on the teacher/librarian side of the information learning process. Rather than creating the content this time, I am learning how to create the structure and make the settings within an account. I realize that teachers and librarians will tinker with different wiki software for their own comfort sake, but I have a suggestion to make when it comes to using wiki software for the first time. Being a student and exploring the wiki process was fairly painless due to the fact that our professor chose a format that all of us students were already familiar with. I've used wikipedia countless of times, and although I haven't done any editing on any articles, yet I am familiar with the structure. This familiarity carried over onto the project. Perhaps starting with MediaWiki when creating a wiki for students might be a good idea if students are already familiar with the Wikipedia format. Just a thought.
Hi Andrea,
ReplyDeleteWow - That's quite the comprehensive wiki. Now I can say I actually know somebody who has contributed to new posting on Wikipedia - impressive:)
Cheers, May
Ditto to May! :)
ReplyDelete